10、数据同步
10、数据同步
elasticsearch中的酒店数据来自于mysql数据库,因此mysql数据发生改变时,elasticsearch也必须跟着改变,这个就是elasticsearch与mysql之间的数据同步。
1. 思路分析
常见的数据同步方案有三种:
- 同步调用
- 异步通知
- 监听binlog
方案一:同步调用
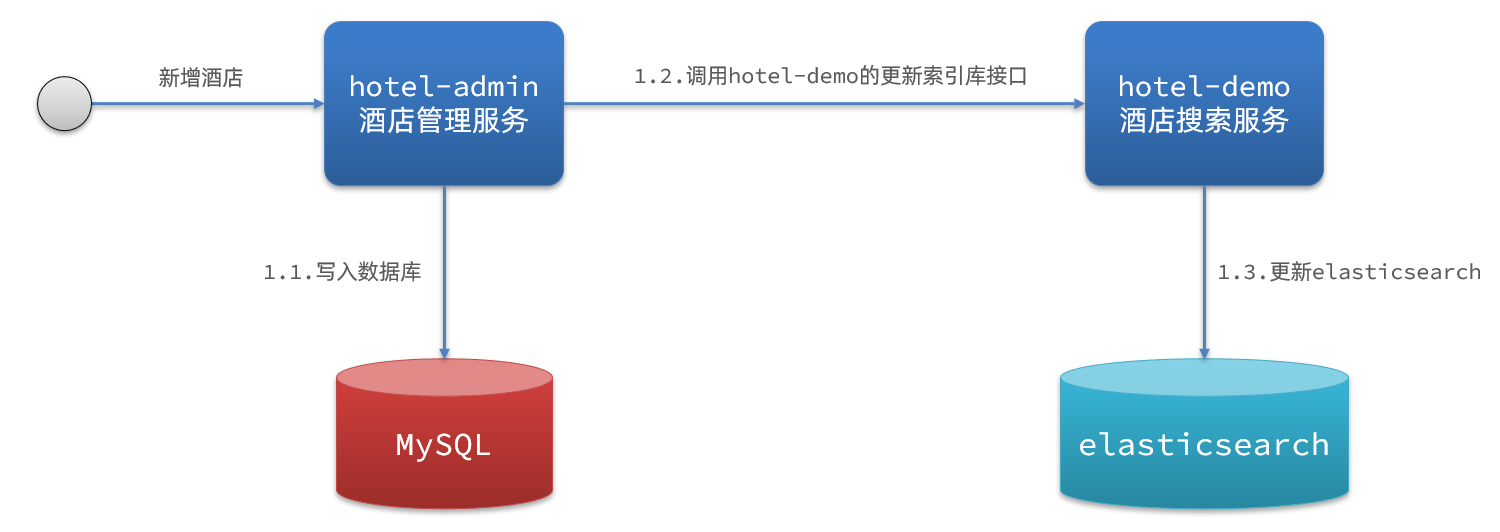
基本步骤如下:
- hotel-demo对外提供接口,用来修改elasticsearch中的数据
- 酒店管理服务在完成数据库操作后,直接调用hotel-demo提供的接口,
方案二:异步通知
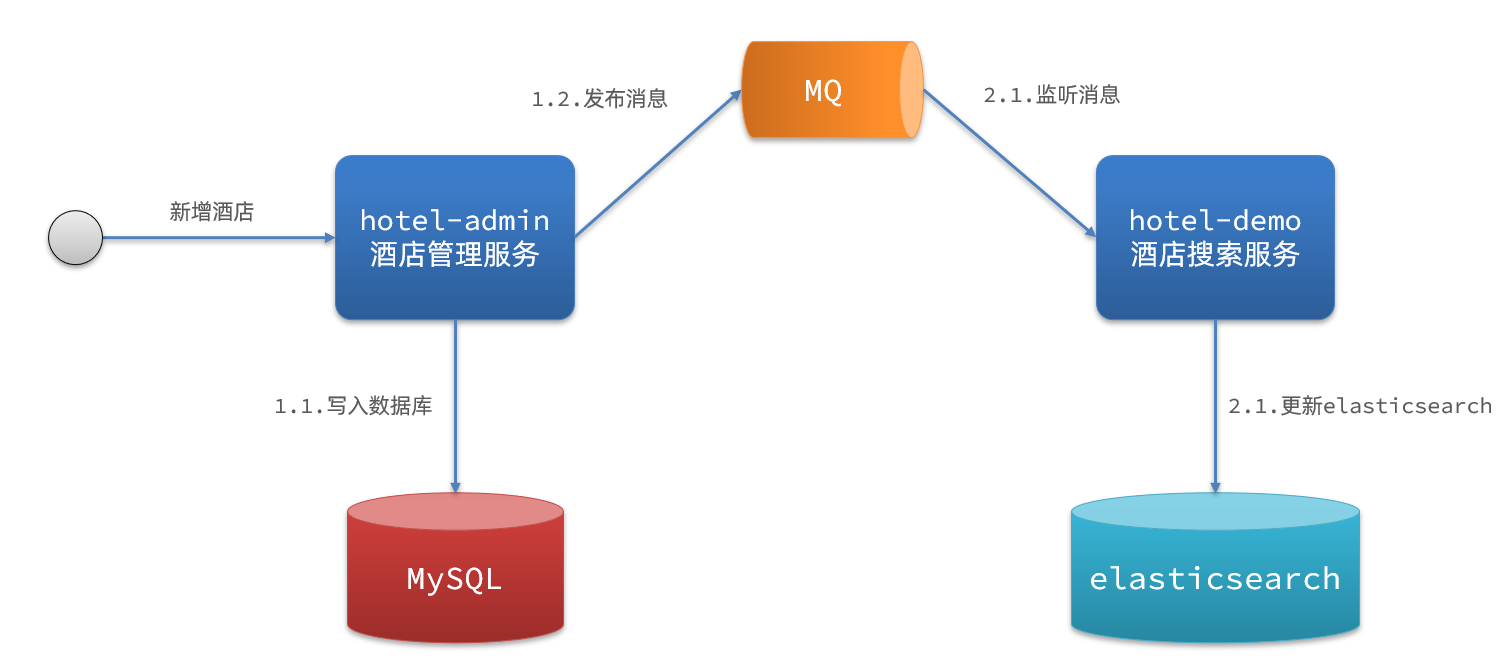
流程如下:
- hotel-admin对mysql数据库数据完成增、删、改后,发送MQ消息
- hotel-demo监听MQ,接收到消息后完成elasticsearch数据修改
方案三:监听binlog
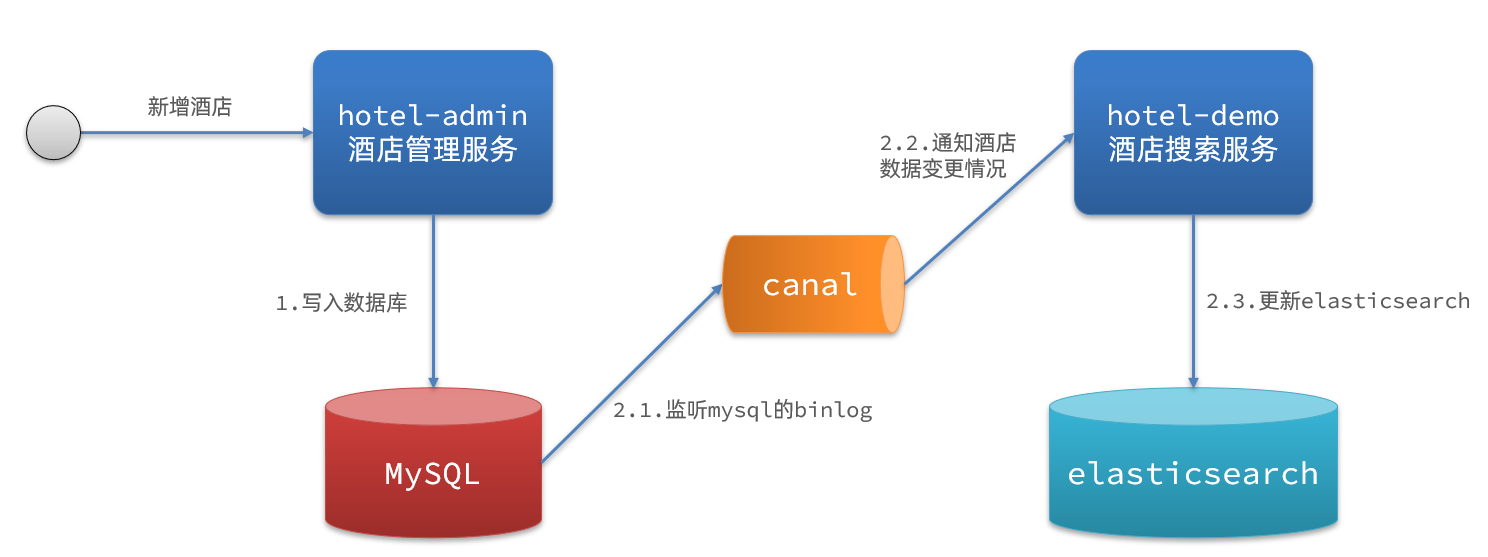
流程如下:
- 给mysql开启binlog功能
- mysql完成增、删、改操作都会记录在binlog中
- hotel-demo基于canal监听binlog变化,实时更新elasticsearch中的内容
2. 实现数据同步
1. 思路
利用课前资料提供的hotel-admin项目作为酒店管理的微服务。当酒店数据发生增、删、改时,要求对elasticsearch中数据也要完成相同操作。
步骤:
导入课前资料提供的hotel-admin项目,启动并测试酒店数据的CRUD
声明exchange、queue、RoutingKey
在hotel-admin中的增、删、改业务中完成消息发送
在hotel-demo中完成消息监听,并更新elasticsearch中数据
启动并测试数据同步功能
运行后,访问 http://localhost:8099

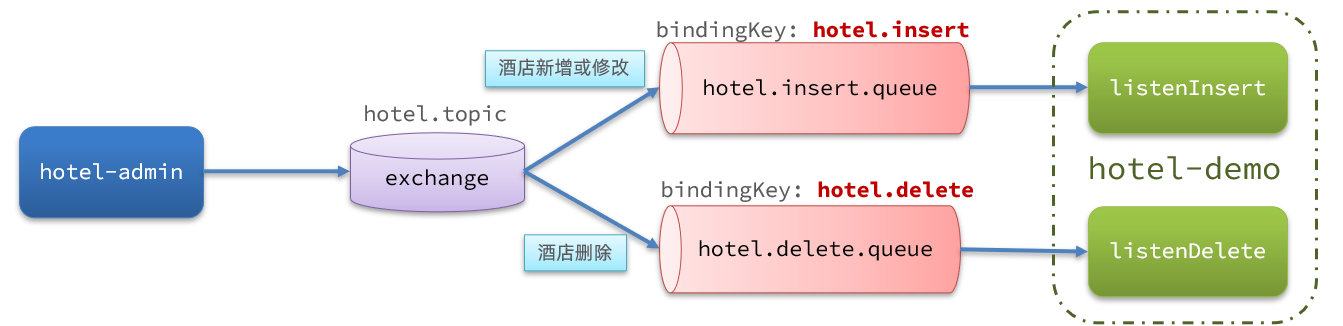
2. 声明交换机、队列
MQ结构如图:
1)引入依赖
在hotel-admin、hotel-demo中引入rabbitmq的依赖:
<!--amqp-->
<dependency>
  <groupId>org.springframework.boot</groupId>
  <artifactId>spring-boot-starter-amqp</artifactId>
</dependency>
2)声明队列、交换机名称
在hotel-admin和hotel-demo中的cn.itcast.hotel.constatnts包下新建一个类MqConstants:
public class MqConstant {

  //新增或更改队列名
  public static final String HOTEL_INSERT_QUEUE = "hotel.insert.queue";
  //删除队列名
  public static final String HOTEL_DELETE_QUEUE = "hotel.delete.queue";
  //交换机
  public static final String HOTEL_EXCHANGE = "hotel.exchange";
  //新增或更改绑定键
  public static final String HOTEL_INSERT_KEY = "hotel.insert";
  //删除绑定键
  public static final String HOTEL_DELETE_KEY = "hotel.delete";


}
3)声明队列交换机
/**
 * MQ配置类 (用于创建交换机 队列 )
 * @Author: 牛冲冲
 */
@Configuration
public class MqConfig {

  /**
   * 创建交换机
   * @return
   */
  @Bean
  public TopicExchange hotelExchange(){
    // 1、交换机名称 2、是否持久化 3、是否自动删除
    return new TopicExchange(MqConstant.HOTEL_EXCHANGE,true,false);
  }

  /**
   * 创建新增或更改队列
   * @return
   */
  @Bean
  public Queue hotelInsertQueue(){
    //1、队列名称 2、是否持久化
    return new Queue(MqConstant.HOTEL_INSERT_QUEUE, true);
  }

  /**
   * 创建删除队列
   * @return
   */
  @Bean
  public Queue hotelDeleteQueue(){
    //1、队列名称 2、是否持久化
    return new Queue(MqConstant.HOTEL_DELETE_QUEUE, true);
  }

  /**
   * 绑定新增或更改队列
   */
  @Bean
  public Binding bindHotelInsertQueue(){
    //1、队列 2、交换机 3、设置路由键
    return BindingBuilder.bind(hotelInsertQueue()).to(hotelExchange()).with(MqConstant.HOTEL_INSERT_KEY);
  }

  /**
   * 绑定删除队列
   */
  @Bean
  public Binding bindHotelDeleteQueue(){
    //1、队列 2、交换机 3、设置路由键
    return BindingBuilder.bind(hotelDeleteQueue()).to(hotelExchange()).with(MqConstant.HOTEL_DELETE_KEY);
  }


}
hotel-admin 及 hotel-demo工程中 引入mq的连接参数配置
spring:
  rabbitmq:
    virtual-host: /
    port: 5672
    host: 192.168.204.138
    username: itcast
    password: 123321
3. 发送MQ消息
在hotel-admin中的增、删、改业务中分别发送MQ消息:
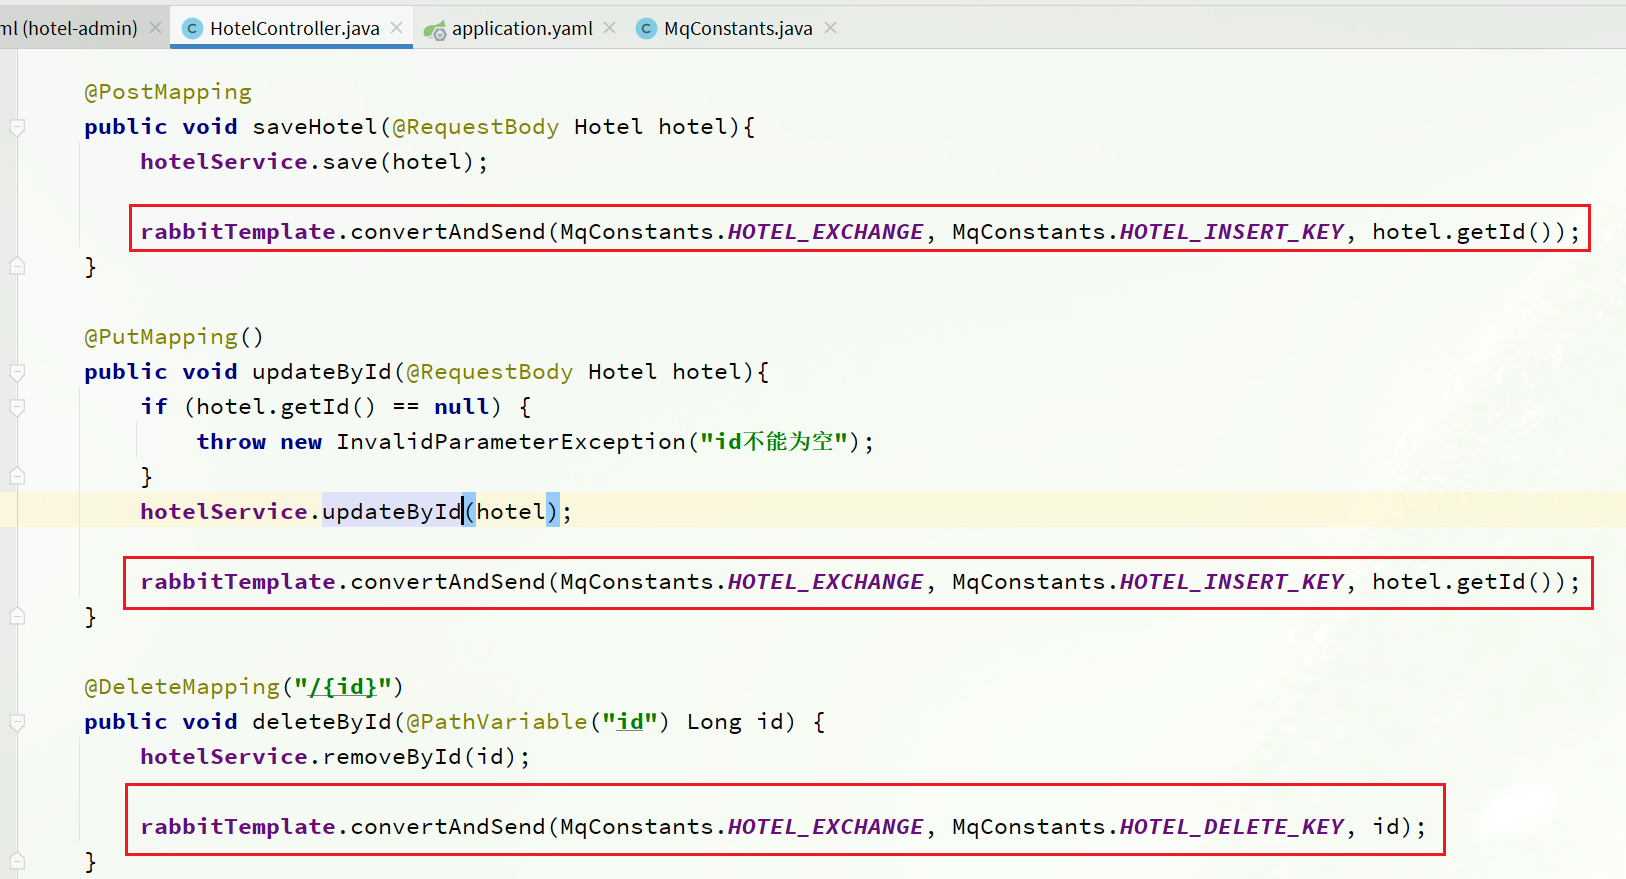
4. 接收MQ消息
hotel-demo接收到MQ消息要做的事情包括:
- 新增消息:根据传递的hotel的id查询hotel信息,然后新增一条数据到索引库
- 删除消息:根据传递的hotel的id删除索引库中的一条数据
1)首先在hotel-demo的cn.itcast.hotel.service包下的IHotelService中新增新增、删除业务
void deleteById(Long id);

void insertById(Long id);2)给hotel-demo中的cn.itcast.hotel.service.impl包下的HotelService中实现业务:
/**
     * MQ 消费者 删除文档
     * @param id
     */
    @Override
    public void deleteById(Long id) {
        //1. 创建请求对象
        DeleteRequest request = new DeleteRequest("hotel", String.valueOf(id));
        //2. 发送请求
        try {
            client.delete(request, RequestOptions.DEFAULT);
        } catch (IOException e) {
            log.warn("删除文档:{},失败", id);
        }

    }

    /**
     * MQ 消费者 新增或更改文档
     * @param id
     */
    @Override
    public void insertById(Long id) {
        //1.从数据库中查询数据
        Hotel hotel =getById(id);
        if (ObjectUtils.isEmpty(hotel)){
            log.warn("根据id:{},查询数据为空",id);
            return;
        }
        //2. 创建请求对象
        IndexRequest request = new IndexRequest("hotel").id(hotel.getId().toString());

        //数据封装
        HotelDoc hotelDoc = new HotelDoc(hotel);

        //3.发送请求
        request.source(JSON.toJSONString(hotelDoc), XContentType.JSON);
        try {
            client.index(request, RequestOptions.DEFAULT);
        } catch (IOException e) {
            e.printStackTrace();
            log.warn("新增或更改文档:{},失败", id);
        }
    }
3)编写监听器
在hotel-demo中的cn.itcast.hotel.mq包新增一个类:
/**
 * 监听器
 */
@Component
public class HotelListener {
  @Autowired
  private IHotelService hotelService;

  /**
   * 监听 删除操作
   * @param id
   */
  @RabbitListener(queues = MqConstant.HOTEL_DELETE_QUEUE)
  public void deleteById(Long id) {
    hotelService.deleteById(id);
  }

  /**
   * 监听 插入操作
   * @param id
   */
  @RabbitListener(queues = MqConstant.HOTEL_INSERT_QUEUE)
  public void insertById(Long id) {
    hotelService.insertById(id);
  }

}